In this tutorial I’m going to explain how measurements work in 3DShoemaker. This will include both foot and last measurements as well as size indices, allowances, and template adapt options. There is a video version of the tutorial above, but I think I did a better job explaining things in the written version.
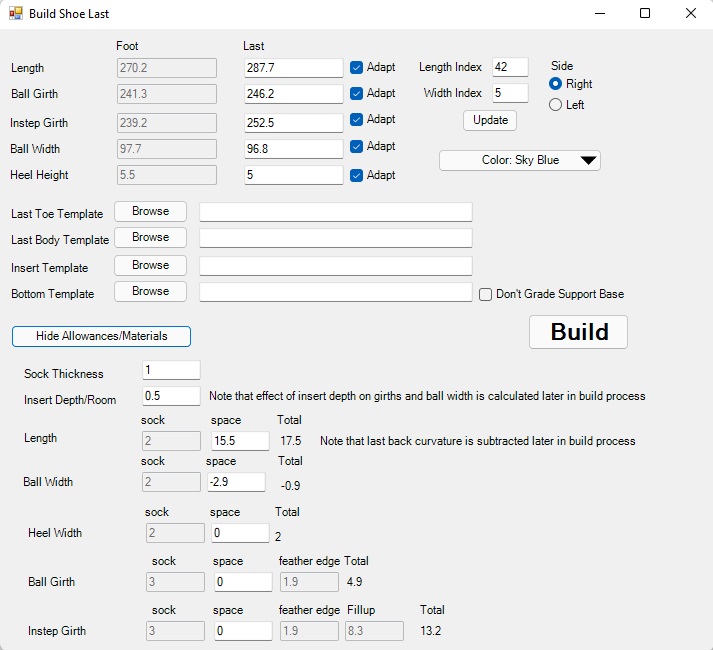
When you press the ‘Build’ button, the build form comes up and has two columns of numbers. One is for foot measurements, and the other is for shoe last measurements. I’ll cover the shoe last measurements first.
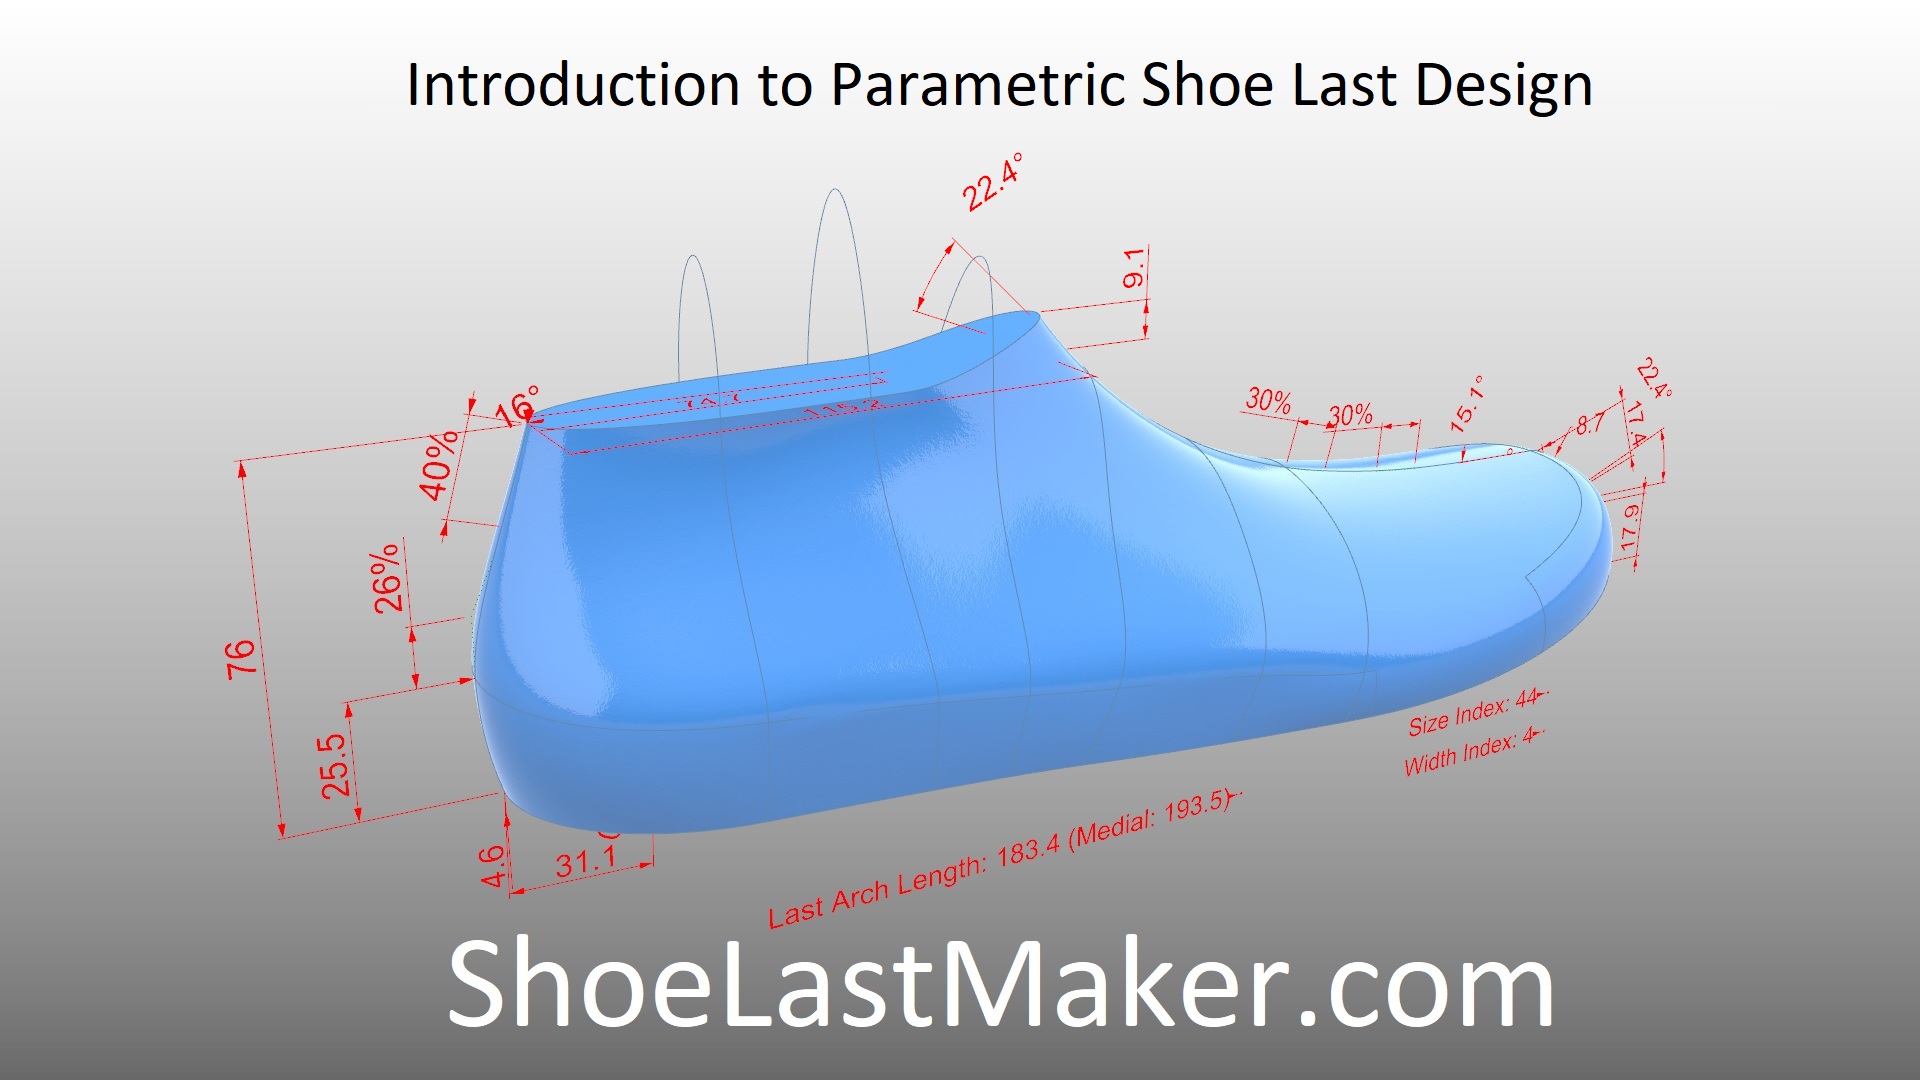
The basic shoe last measurements are the primary measurements required to design a shoe last. All other measurements are calculated from these. The measurement definitions can be understood by studying the image below. Note that last length is the length along the profile curve of the last bottom surface, and covers the full length of the last including any possible stylistic toe extension. This is different from functional length, which does not include stylistic extensions. Both functional and full length measurements can be viewed and edited from the profile view of the shoe last. The size and width indices are also on the same view.
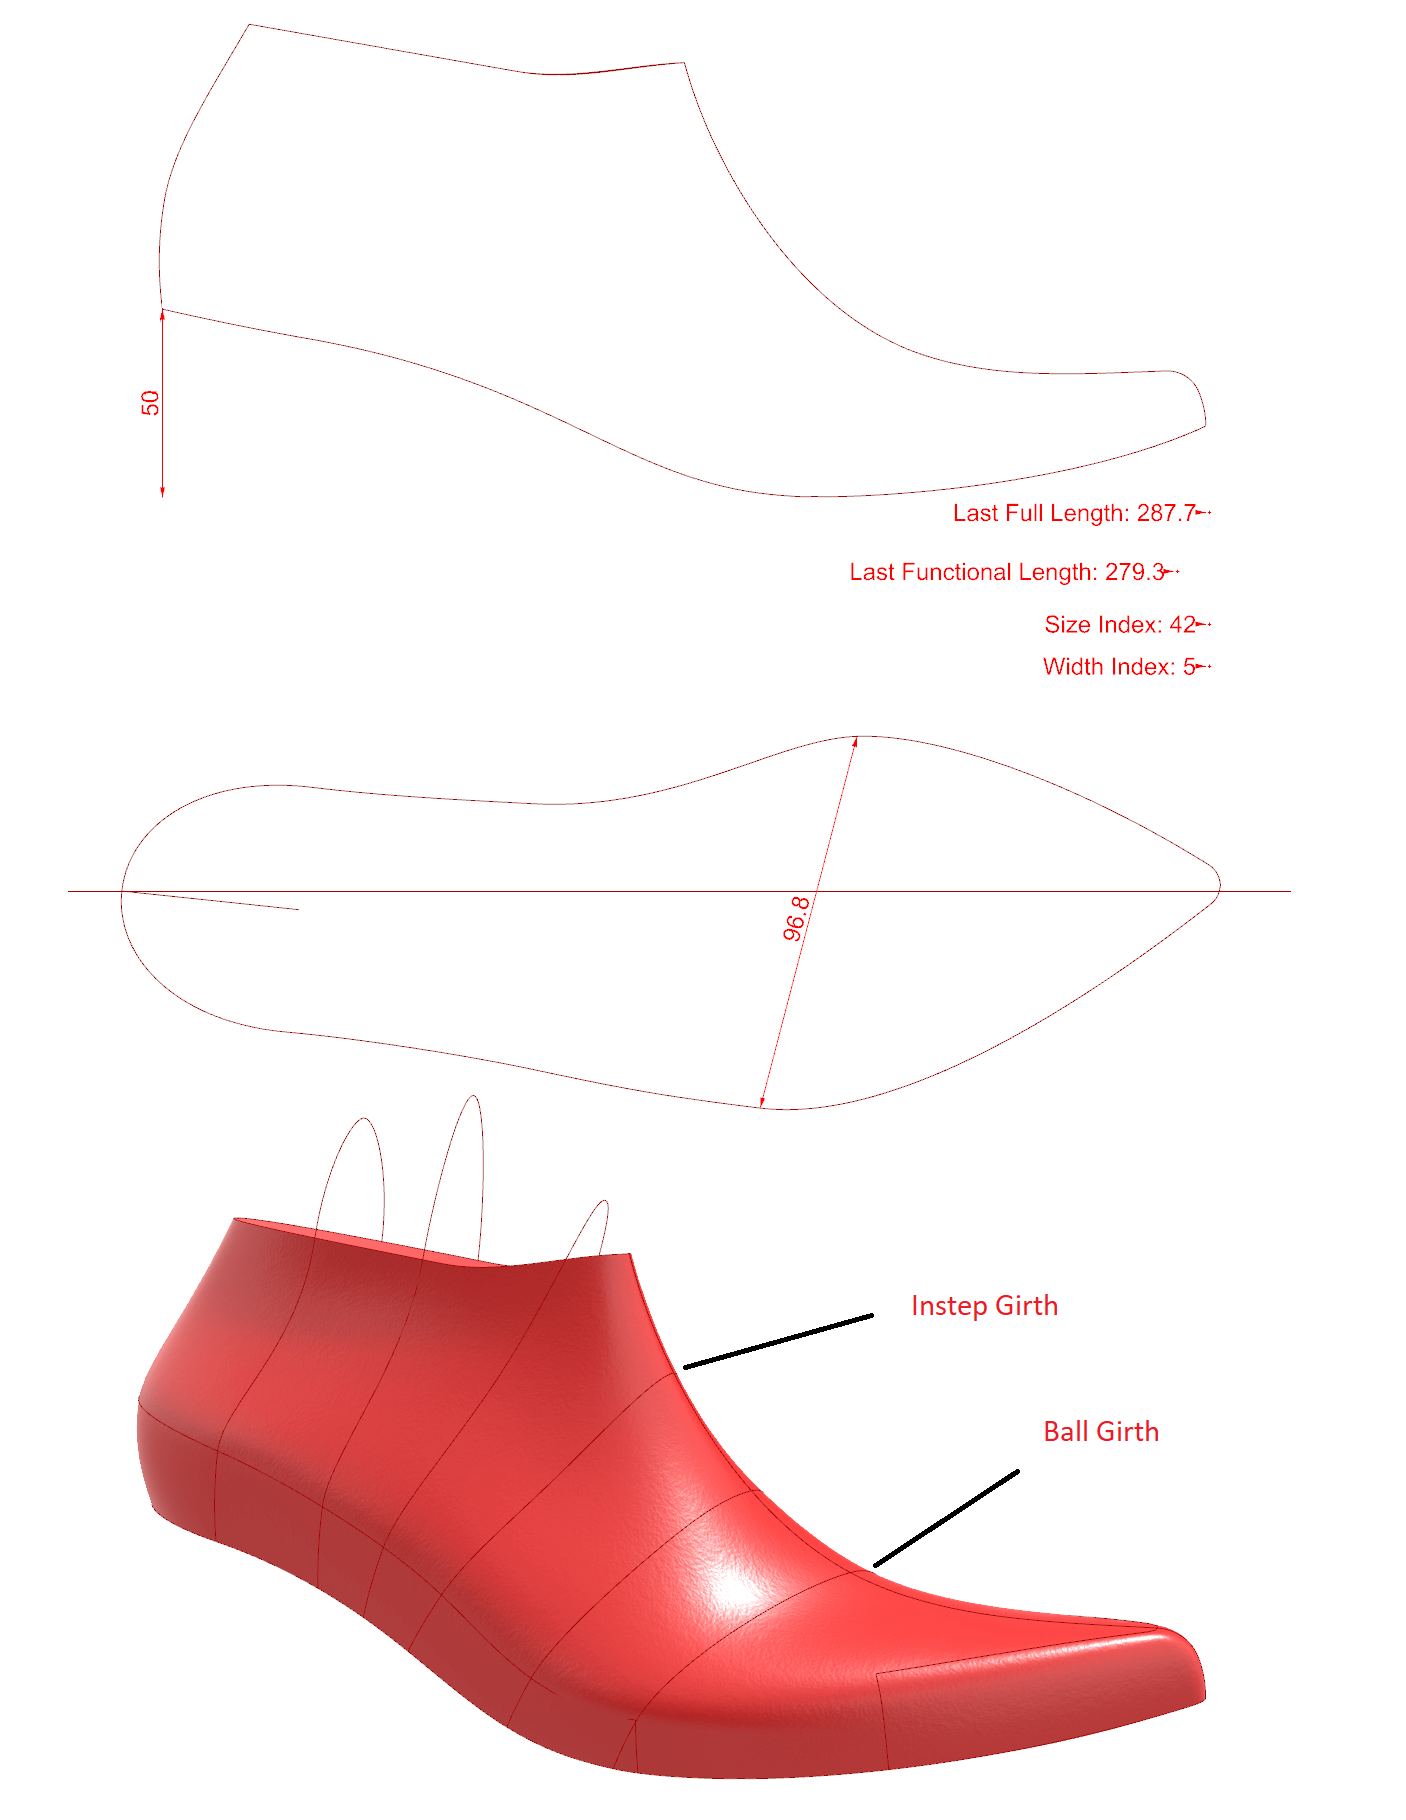
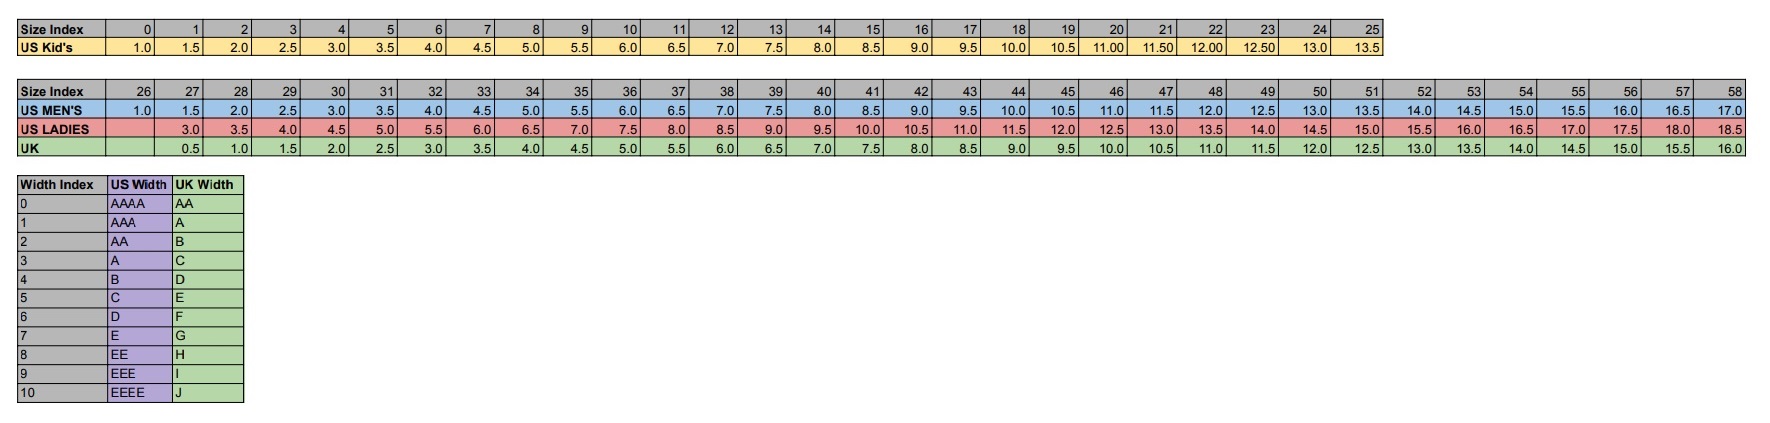
Size and width indices correspond with US and UK shoe sizes for men’s, women’s, and children’s sizing as in the chart below. An index system is used so as to reduce the dimensions need to fully define the measurement system. Shoe last measurands in the build form can be populated by finding the desired index on the grading chart, inputting this into the build form, and pressing the update button. The built shoe last will have the selected indices noted on the profile view.
To the right of the last measurements are check boxes that allow you to ‘Adapt’ the measurements to the selected templates. This works slightly differently for each of the measurements, so I’ll explain them one at a time. For last length, choosing to adapt the measurement to the template means that the last length specified will be treated as the functional last length, and stylistic extension of the template will be added on to determine the full last length. Whereas if the ‘Adapt’ option is turned off, the built last will have the specified measurement as both the functional and full last length.
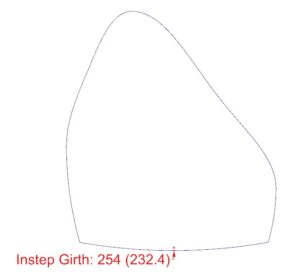
Unlike with last length, the girth measurements do not have both functional and full types. There is just the girth measurement. When the ‘Adapt’ option is off, then the built shoe last will have the exact measurement specified. When the ‘Adapt’ option is on, the difference between the templates girth measurements and the girth measurements for the templates size indices is graded and applied to the specified measurement. This allows for the development of templates targeting specific foot types. On a related note, girth measurements are altered when the option to trim a shoe last by an insole (insert) surface is turned on. The altered measurement is shown in brackets when editing the girth curves (but can’t be edited).
Again, the ball width measurement also differs in how the ‘Adapt’ option works with it. When ‘Adapt’ is off, the built shoe last will take on the exact specified measurement. When ‘Adapt’ is on, the ratio of the ball width to the ball girth of the built shoe last will be the same as that in the specified template. The idea here is to either keep the aspect ratio of the template when ‘Adapt’ is on or achieve the desired ball width exactly, which is necessary for bespoke lasts.
Lastly, the ‘Adapt’ option for the heel height also works a bit different. When it is off, the built shoe last takes on the exact measurement specified. When the ‘Adapt’ option is on, the the built last gets the heel height of template shoe last graded to the specified length, thereby achieving a similar shape. On a related note, the wedge angle is calculated automatically unless specified otherwise in the options form.
Circling back to foot measurements, they are shown in a column next to the corresponding shoe last measurements. If it is a bespoke or custom shoe last that is being built, then foot measurements can be adjusted by editing the foot. Whereas on the build form, they are static and added to the allowances to determine the shoe last measurements shown when the build form is first opened. If a foot is not present in the session and it is a standard last that is being built, then the foot measurements shown in the build form are simply the last measurements minus the allowances to give the designer some idea of what the corresponding foot measurements would be.
Finally, there are the allowances. As I mentioned before, allowances are either added to foot measurements to determine last measurements, or subtracted from last measurements to determine likely foot measurements, depending on whether developing a bespoke or standard shoe last. Allowances are accessed by pressing the ‘Show Allowances’ button.
Insert depth and sock thickness are both in the allowances section, but aren’t necessarily allowances. Rather, they are factored into the calculation of allowances. Insert depth doesn’t get factored into measurements until later in the build process, as it isn’t yet known for the template shoe last at this point. Though it does alter the relationship between foot and last heel height in the build form. The standard insert depth for all shoe lasts is 0.5mm, which is enough space for a sock lining. But if the intended footwear will require additional space for orthotics etc., then you can specify the desired amount. Note that you can also adjust for insert depth after the shoe last is built via the ‘Adjust’ drop down. You may save templates with insert depths other than the 0.5mm, though this measurement is reset to 0.5mm when the template is used to build a new last.
The allowances are shown in a 2D array, with the rows consisting of the various measurements affected by the allowance, and the column being the way in which the allowance affects the measurement. For instance, the sock column for the last length row displays by how much the input sock thickness affects the last length calculation. The space column, unlike the sock column, isn’t controlled by an outside parameter but rather is input by the user. It represents how much extra room is allowed. For instance, extra space is required in the length of the shoe last so that the toes do not touch the end of the footwear.
The feather edge allowances apply only to the girths and account for the additional girth amount due to the fact that shoe lasts have sharp edges whereas feet don’t. Finally, the instep girth fill-up accounts for the arch height of the foot given a higher arch will leave empty space in the shoe.
I have one last detail relating primarily to bespoke and custom shoe lasts I would like to add, and it is a subtle one. When a foot is in the session, the back curvature of the template last needs to be accounted for, given this is the spot the back of the foot docks against, and not the last bottom edge. And given the template details are not known until the build process starts, the final shoe last measurement will be updated as the last builds. In other words, when building a bespoke last, the final shoe last length will be slightly less than that shown in the build form. Conversely, when building standard lasts, the appropriate foot length will actually be slightly more than that shown in the build form.
That’s about it for what you need to know about measurements in 3DShoemaker. It’s a lot for one tutorial, but it’s all related, so I figured I’d put it all together. Undoubtably it will take some time to fully grasp it all. If you have any questions, please let me know.


6 thoughts on “Measurements in 3DShoemaker”
What is the app name? How can i search this app for use? How can i apply this app.
3DShoemaker for Rhino: https://3dshoemaker.com/3dshoemaker-shoe-last-and-component-design-software/
Please send details
https://3dshoemaker.com/3dshoemaker-shoe-last-and-component-design-software/
Good design
Thanks!